In this post I will discuss how to create a desktop gadget for windows vista and windows 7 using WPF or Silverlight. I’m going to do my examples using WPF but the approach will be exactly the same for Silverlight.
Last week Friday my manager started with an innovation hour at the office to discuss new ideas to implement at the client, and the topic of desktop gadgets came to light. In our project I could see the benefit of what my manager was talking about and was thinking about how cool it would be if this gadget can be in WPF or Silverlight application.
Saturday morning this desktop gadget was haunting me so bad that I had to figure out how to do this. In my quest to find an answer I spent 4 hours researching desktop gadgets, 2 hours trial and error, and found very little information on the web relating to the usage of WPF in a gadget.
I started from the basic of creating the html page for the gadget, trying to embed the WPF in the page using an object, which failed; it did work for the Silverlight but only for 32bit, as silverlight cannot yet run on 64bit as mentioned by my manager as well. I moved on trying to create a WPF usercontrol and loading it inside a win forms control and embedding that on the page. To my surprise this actually worked, but there was a lot of rendering problems with this technique and I quickly discarded that idea.
After a while and some trial an error I came up with a simple solution that worked, which made me say: “Why didn’t I think of this in the first place?” The simple solution was to add an iframe to the gadget’s html page and load the WPF application as an xbap into the iframe.
I soon came to realize there are some tricks to the gadget that no one tells you in order to get the right size for the gadget as well as transparency. You have to add a background image to the gadget, in my case a simple png image with rounded corners. If you do not specify the background image you end up with a nasty square iframe as your border or container.
What I did was to create the image and load the iframe nicely inside the image, and set the background color of the iframe the same as the background of the image, thus hiding the iframe from the end user, this is illustrated below.
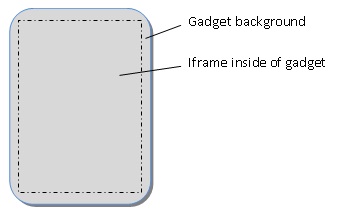
With this approach we just created a nice container for virtually any content, in this case our WPF application.
The first step in creating the gadget would be to create your background image.
After creating the background image, open Visual Studio and create a new WPF browser application by selecting the template provided.
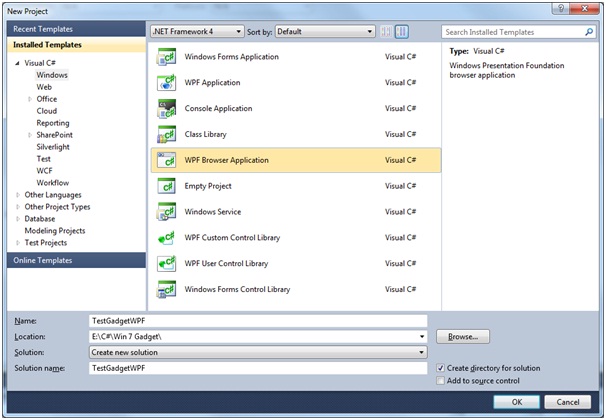
This will create your WPF browser application that will be the content inside the iframe.
Next step is to add an empty project to the solution for the gadget; this does not need to be any specific type of project as we won’t be building anything.
My test WPF application will just consist of a simple text box and a search button, but this can be any content or functionality you wish to expose to your users inside the gadget.
<Grid>
<StackPanel Width=”Auto” Height=”Auto” Margin=”4,2,4,2″>
<TextBlock FontWeight=”Bold” HorizontalAlignment=”Center”>
<TextBlock.Text>Content Search</TextBlock.Text>
<TextBlock.Foreground>
<SolidColorBrush Color=”DarkBlue” Opacity=”0.9″></SolidColorBrush>
</TextBlock.Foreground>
</TextBlock>
<TextBox Name=”txtDescription” Height=”25″ Width=”110″ Margin=”0,10,0,0″></TextBox>
<Button Name=”btnSearch” Height=”22″ Width=”80″ Margin=”0,5,0,0″Click=”btnSearch_Click”>Search</Button>
</StackPanel>
</Grid>
The next step is to build the gadget container inside the second empty project.
In this project Add a default.html page, a gadget.xml page, and your background image created earlier. The default page will be the container page or the main page for the gadget.
The default.html page would look similar to this:
<!DOCTYPE HTML PUBLIC “-//W3C//DTD HTML 4.0 Transitional//EN”>
<html>
<head>
<title>Test Gadget</title>
<style>
body
{
width: 150px;
height: 200px;
padding: 0;
margin: 0;
vertical-align:middle;
text-align:center;
}
</style>
</head>
<body>
<g:background id=”gBackground” src=”FullTransparrent.png” style=”vertical-align:middle; text-align:center;”>
<div style=”padding-top:10px; padding-right:2px;”>
<iframe height=”178px” frameborder=”0″ width=”128px” bordercolor=”#a4a4a4″style=”background-color:#a4a4a4;” src=”TestGadgetWPF.xbap” />
</div>
</g:background>
</body>
</html>
Notice the background image, and the placement of the iframe, the iframe and the gadget content must be inside the background tags in order for the content to appear on top of the image.
Also make note of the source of the iframe, this will be the name af the deployed WPF browser application which we will get to just now, as well as the sizes. This is a bit tricky and requires a few rebuilds to get the iframe within the bounds of the image.
After creating the html container page we need to specify some settings for our gadget. In the gadget.xml create the following settings:
<?xml version=”1.0″ encoding=”utf-8″ ?>
<gadget>
<name>Test Gadget</name>
<namespace>TestGadgetWPF</namespace>
<version>1.0</version>
<author name=”Your Name”>
<info url=”http://yourWebsite.com” />
</author>
<copyright>2010</copyright>
<description>Desktop Gadget to search the web</description>
<hosts>
<host name=”sidebar”>
<base type=”HTML” apiVersion=”1.0.0″ src=”default.html” />
<permissions>full</permissions>
<platform minPlatformVersion=”0.3″ />
</host>
</hosts>
</gadget>
Inside the settings file we can specify the name of the gadget that would appear in windows, as well as specify the source of the gadget, in this case we leave it as default.html.
The last step would be to deploy the two projects and build the gadget installer.
First deploy the WPF browser application using click once to a folder of your choice. Open the project properties and go to the publish tab:
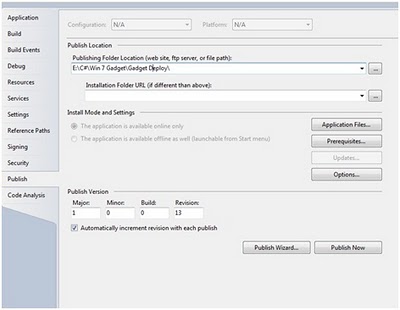
Point the publish location the desired directory and click Publish Now. This will create an Application Files folder and a TestGadgetWPF.xbap file which will be the source of your iframe as specified above.
Copy the 3 files (default.html, gadget.xml, background image) from the gadget container project to your deploy folder.
Zip all of the files inside the deploy folder to a .zip archive and rename the file from .zip to .gadget, double click the file and install your gadget, windows automatically recognizes .gadget as a gadget and prompts to install the gadget.
Now you can enjoy your very own desktop gadget.
The next steps to improving the gadget would be to allow for a settings page and provide an expand option as well as a fly out page for extra details.