Today’s blog post is about ASP.Net Web API. I will demonstrate 2 architectural patterns that I have identified in my experience, the pros and cons of each as well as how your API can be self-documenting using Help Pages.
What is Web API?
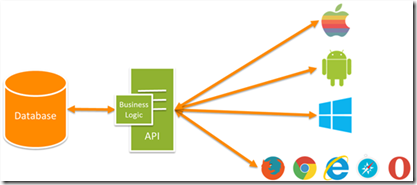
Web API is a standard way of implementing REST services using Microsoft technologies such as MVC and C#. These services can be used to expose a set of business resources to external providers or systems without exposing your business rules or logic.
What is REST?
REST stands for ‘Representational State Transfer’ and it is an architectural pattern for creating an API that uses HTTP as its underlying communication method.
Rest consists of: Resources, Request Verbs, Request Headers, Request Body, Response Body, and Response Status codes.
Resources – REST uses addressable resources to define the structure of the API. These are the URLs you use to get to pages on the web, for example ‘http://www.microsoft.com/Surface-Pro-3’ is a resource.
Request Verbs – These describe what you want to do with the resource. A browser typically issues a GET verb to instruct the endpoint it wants to get data, however there are many other verbs available including things like POST, PUT and DELETE. See the full list at http://www.w3.org/Protocols/rfc2616/rfc2616-sec9.html
Request Headers – These are additional instructions that are sent with the request. These might define what type of response is required or authorisation details. See the full list at http://www.w3.org/Protocols/rfc2616/rfc2616-sec14.html
Request Body – Data that is sent with the request. For example a POST (creation of a new item) will required some data which is typically sent as the request body in the format of JSON or XML.
Response Body – This is the main body of the response. If the request was to a web server, this might be a full HTML page, if it was to an API, this might be a JSON or XML document.
Response Status codes – These codes are issues with the response and give the client details on the status of the request. See the full list at www.w3.org/Protocols/rfc2616/rfc2616-sec10.html
Benefits of Web API
Modern HTTP programming model – Directly access and manipulate HTTP requests and responses in your Web APIs using a clean, strongly typed HTTP object model.
Content negotiation – Web API has built-in support for content negotiation – which enables the client and server to work together to determine the right format for data being returned from an API. We provide default support for JSON, XML.
Model binding and validation – Model binders provide an easy way to extract data from various parts of an HTTP request and convert those message parts into .NET objects which can be used by Web API actions.
Routes – Web APIs support the full set of routing capabilities supported within ASP.NET MVC and ASP.NET today, including route parameters and constraints.
Flexible Hosting – Web APIs can be hosted within any type of ASP.NET application (including both ASP.NET MVC and ASP.NET Web Forms based applications).
Web API option 1
Web API option 1 uses all the Http Verbs to describe the action performed on a resource. A resource typically has one endpoint or URL for example http://api.yourdomain.com/user
Depending on the Http Verb the api would perform certain actions, for example:
- Http Get
- Retrieves a list of objects
- Http Get – with an id in the url (http://api.yourdomain.com/user/1)
- Retrieves a specific object
- Http Post
- Updates an object
- Http Put
- Inserts an object
- Http Delete
- Removes an object
This way of building Api’s usually also relies heavily on http status codes to inform the system what state the result or resource action is in.
You would also need a different controller for each entity.
Web API option 2
Web API option 2 is my personal favorite. It uses Get and Post only but relies a lot more on routing.
In option 2 you will only use Http Get requests for any resource where no parameter has to be passed. For example, to retrieve a list of all users you could do a Get request to http://api.yourdomain.com/user/GetAll
The difference comes in when you need to be specific about what you want to request or to make any changes. Using option 2 you will always use Http Post.
Now lets say we want to request a specific user, we will need to post our user ID to our api end point, in this case http://api.yourdomain.com/user/GetDetails
We can structure our request model in JSON as:
{
“UserID”:1
}
After posting this to your api you will now receive a result back that resembles the structure of a user object.
In both examples you will see that the resource Uri has an additional segment called “GetAll” and “GetDetails”. This is added so that the endpoints will make sense when used since we no longer rely on Http Verbs to differentiate our actions. When sharing the api with 3rd parties anyone will know what your api does just by looking at the routes.
Benifits of API Option 2
The beggest advantage of using Api option 2 is security. When using SSL encryption the request body will be encrypted, meaning that your parameters or data is not exposed in clear text when traveling over the wire. With option 1, the user ID would have been clearly visible to anyone who intercepts the request.
A second advantage is that you can now start programming against structured Request and Response models which can also be shared with your api consumers.
Using data annotation these models can be validated in the same manner as view models in MVC, giving you a lot better quality of data and flexibility.
In option 1 you would have had to validate each parameter using business rules.