O my but it’s been a while since I last posted to my blog. For a while now I wanted to post something a little more technical but I can’t reveal anything specific about the current projects I am working on which is why I have been so scares lately.
Over the last few weeks I have been working on an extra project for Avanade which involves electronics, specifically Arduino and NFC, as soon as the project is done I’ll see if I can post more as to what it is about, but if this ever goes beyond the POC phase, it’s going to be massive.
For this project I used the NFC breakout board in order to read the unique ID of any NFC tag, you can get one from Micro Robotics in Centurion.
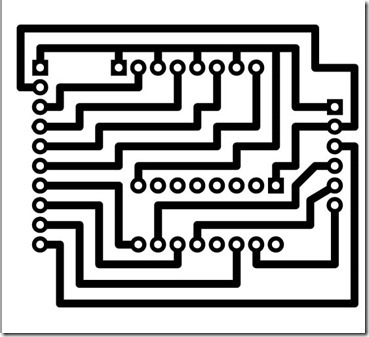
When creating prototype projects with Arduino the wiring can sometimes become quite messy using a breadboard and just by wiring up the breakout board alone according to the diagram below results in a messy solution, and that’s not even the rest of the sensors and components.
After doing my initial tests using the breadboard to insure that everything works I decided to rather create a small PC Board that can do the same, but without the messy wiring.
For this PC Board I initially used the Press-n-peel transfer film that you can buy from Communica. This is not the easies thing to get right and takes a few tries to master. Fortunately for me I have a good friend with a CO2 laser, which makes things a lot easier. Just clean the copper side of the PC Board, spray on some metal primer and burn off everything that is not a circuit track using the laser and soak it in ferric chloride as usual. Below is the diagram for the circuit board that I created to wire up the NFC breakout board to the Arduino:
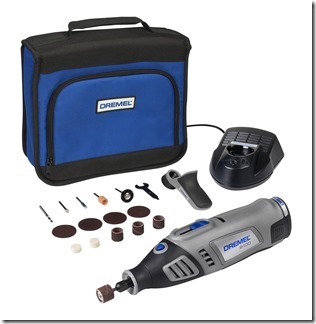
One problem I ran into after creating this the PC Board is now how to get those holes in the board where the components must go. For any person who has a handy friend or partner with a press drill this wouldn’t be a problem, but for a girl like me this would normally be a huge challenge, fortunately there is company called Dremel, that makes really cool and compact multi tools that is easy to use, and I can guarantee that you won’t break a nail using this, unless you drill through your nail.
I bough myself the Dremel multi tool from Makro, including the work station and the cutting wheel set. With all of this you will certainly be able to create any hobby projects as well as in my case be able to create those very small holes in the PC Board. The Dremel is very accurate and because it was designed for very precise work, it is ideal for electronic projects.
The Dremel multi tool is great for indoor projects, it uses very little space with the compact design and can fit on any table in the office. I enjoyed the fact that this specific tool is cordless and that the battery lasts for more than a whole day of continues use. I would definitely recommend anyone that is into arts, crafts, hobbies or like me electronics to invest in a Dremel multi tool.
During the coarse of this project I have also created various other circuit boards to simplify connecting the components to the Arduino, and from personal experience it is definitely easier to just create a quick circuit board than to use a breadboard for prototyping.